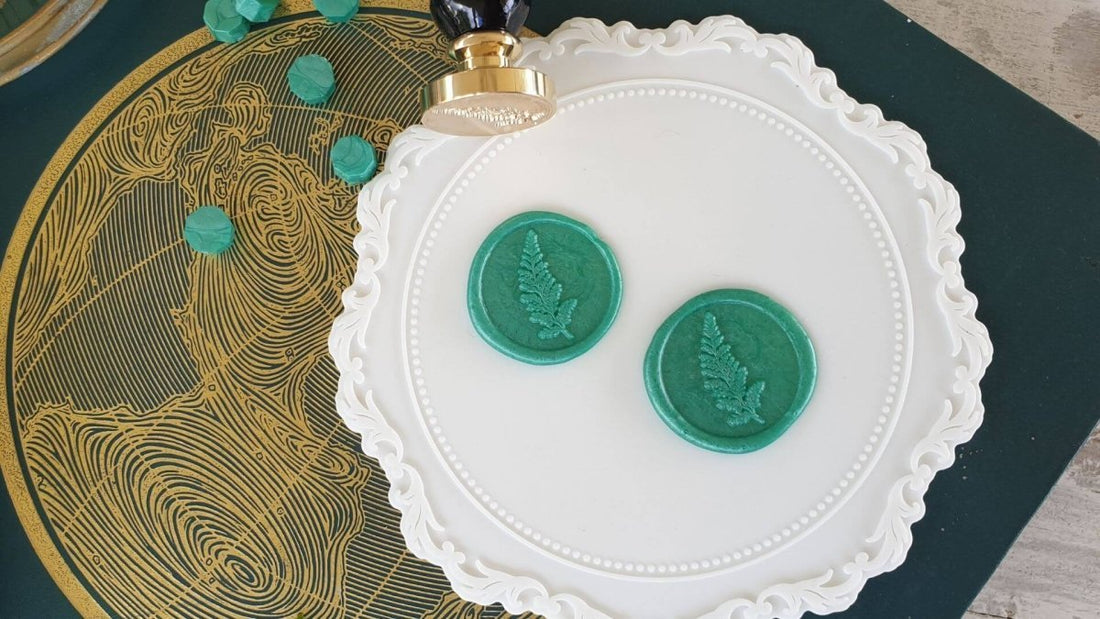
How to Make Perfectly Round Wax Seals: 5 Easy Steps
Rebecca KellyShare
In Short:
Wondering how to make perfectly round wax seals?
We've got you covered!
Welcome to our blog post on how to make perfectly round wax seals! In this guide, we will provide you with five easy steps to create beautiful and professional-looking wax seals. Whether you are a beginner or have some experience, these tips will have you making circular wax seals in no time!
Wax sealing is a slow craft, that harks back to a simpler time. It appeals to our sense of nostalgia and calls us to slow down, take time and be intentional. Each wax seal is unique, like a fingerprint or snowflake, no two are identical. Taking the time to add such a personal, handcrafted touch to an invitation, gift or letter is that extra special touch that will make a lasting impression on your recipient.

Whilst we love the evocative appearance of a rustic, organic shaped wax seal, we know that some invitations designs really come together with the addition of a symmetrical, circular wax seal. If you are wondering how to make wax seals at home, we've put together five easy steps to get you started.
Perfectly Round Wax Seals in 5 Steps:
- Use a completely flat surface
- Use the right amount of wax
- Master the pour technique
- Correct wax seal stamp placement
- Practice to perfect your technique
Read on for detailed instructions, tips and tricks.
Preparation: Gather Your Materials
Before you start making wax seals, make sure you have all the necessary materials at hand.
SUPPLIES
You will need:
- Wax sealing beads in your preferred colour
- A wax seal stamp with a design of your choice
- A heat source (such as a tealight candle and wax melting stove)
- A wax melting spoon
- A heat-resistant surface
- A silicone wax sealing mat or practice sheet of paper
What is the first step to making perfect round wax seals?
STEP 1: USE A COMPLETELY FLAT SURFACE
The first step to making perfectly round wax seals is to ensure you have a flat surface. Find a sturdy and level table or desk where you can work comfortably. This will provide a stable foundation for creating your wax seals. Ensure the surface you are pouring onto is flat without creases or wrinkles. Any fold or crease in the surface will cause the wax to run in a different direction, resulting in an asymmetrical shaped seal. Silicone, heat-proof wax sealing mats are the ideal surface to use. This allows you to easily remove the wax seal once cooled. You can even re-melt your wax seal if it didn't come out quite right. This allows you to practice without compromising the finish of your craft project or beautifully crafted invitation.
What is the best surface for wax seals?
Pouring sealing wax directly onto envelopes or gifts will result in a natural, organically shaped wax seal, as the melted wax will run off the higher areas and pool in lower areas or along envelope seams. This still creates a stunning effect, but I am guessing that's not what you're here for! So if you are looking to perfect a round wax seal, stick to pouring your wax seals onto a silicone wax seal mat and then attaching them to your desired location with glue or double sided tape.
STEP 2: USE THE RIGHT AMOUNT OF WAX
How many wax beads should I use for the perfect wax seal?
The second step is to use the right amount of sealing wax. Depending on the size of your wax seal, you will need 3-4 wax beads, you may need to test this to get it just right. Use a wax melting spoon to heat the beads over the wax melting stove until they melt completely. Do not leave the wax on the heat too long. If the wax begins to bubble, it is too hot. The ideal sealing wax consistency is similar to runny honey. Be sure to choose a high-quality sealing wax that is specifically designed for creating wax seals.

STEP 3: IT'S ALL IN THE POUR
What is the correct way to pour the melted wax?
The third step in making perfectly round wax seals is arguably the most important. Step three is to pour the melted wax directly into the centre point of your desired location. Avoid moving the wax spoon around while pouring to maintain a clean and even distribution of the wax. This will help you achieve a perfectly round shape. The temptation is to try to create a circle by swirling the wax spoon in a circular manner as the wax pours out, this is not required. Simply allow the wax to pour from the spoon directly into the one point, the wax will naturally form a round pool.
STEP 4: WAX SEAL STAMP PLACEMENT
How should I place the wax stamp for the best results?
The fourth step is to carefully place the stamp on the wax. Aim for the middle of the wax pool and apply gentle, even pressure. There is no need to press down with force, the weight of the stamp itself, is usually enough. Before fully compressing the wax seal stamp, you can sometimes slightly readjust its position to ensure it is centred in the wax pool, you can see me do this in the video above. This will give you a well-defined and centred design on your wax seal.
How long do you let a wax seal sit?
After about one to one and a half minutes, the sealing wax should be firm enough to remove the wax seal stamp. After the wax has cooled and set, carefully lift the wax seal stamp up and away from the wax. Make sure to do this slowly and steadily to avoid smudging or distorting the seal. If the stamp sticks to the wax, wait a few more seconds for the wax to cool further before attempting to remove it.
The time the wax takes to cool can vary quite a bit depending on the ambient air temperature at the time. Colder weather or cool sir conditioning can make wax set much more quickly.

What is the final step to mastering the art of wax seals?
STEP 5: PRACTICE MAKES PERFECT
The fifth and final step is practice.
Practice makes perfect! Don't worry if your first few attempts are not as round or precise as you'd like. Making perfectly round wax seals requires practice and patience. With a little practice, you will improve your technique and create beautifully round wax seals. Experiment with different amounts of wax, stamp placement techniques, wax colours, and stamp designs to find your unique style. With time and practice, you will become an expert in creating beautifully crafted, perfectly round wax seals.
Remember, the key to making perfectly round wax seals is to have a flat surface, use the right amount of wax, pour directly into the centre point, place the stamp accurately, and practice. With these five easy steps and a little practice, you'll be able to create professional-looking wax seals that add a touch of elegance to your letters, invitations, or crafts. Most importantly, enjoy the process and have fun!
Looking for more inspiration?


